| GM Arts Wah Modifications |
Here are some modifications I made to the standard wah pedal circuit back in the 80s. You can still get the genuine standard sound, but in addition, you get:
It's somewhat disappointing seeing pedal released in 1997 touting these features as some type of breakthrough. I'm sure its physically and electronically a very good pedal, but maybe I missed my calling 10 years earlier!

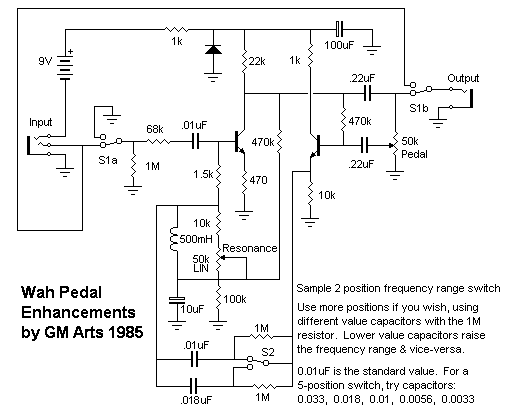
Your wah circuit will be similar to the one above, although some component values may vary. The changes to make are:
The right way to do this is with a small extra pc board to accommodate the new components, firmly secured inside the case, and wired carefully and neatly. Unfortunately, I did none of these things, but it worked reliably and if it ain't broke ...
I used a pot for the resonance control mounted just forward of the socket on the side of the case, and I used a three position ON-ON-ON mini-toggle (these can be wired as a single pole, 3 way switch) for three frequency ranges. This switch is small and fits behind the socket. You could use a rotary switch, but you need to be sure it fits in the case, of course.
I wired the 1M resistor direct on the circuit board, and *carefully* removed the .01uF capacitor and 33K resistor, wiring a 10K resistor soldered at one end only. This is really quite shabby, but given that its all enclosed, has been reliable.
Equally shabby, the 1M resistors are located on the back of the switch, with the 3 capacitors wired at one end on the switch and all wired together at the other end. Using caps with solid wires this is really quite strong, but doesn't look good, and would not pass any serious quality inspection.
Nevertheless, its a foot pedal, and gets kicked around, and it still works. I should admit that despite this new flexibility, 95% of the time I use the standard settings.
Total cost: under $20 Australian!